Since our area of Texas is experiencing an Exceptional Drought, water is obviously at a premium. So with the threat of another stormfront possibly dropping precipitation, we scrambled earlier this week to install another rainbarrel near the garden. I'd wanted rainbarrels for years, but I've finally come to realize that "good enough" is better than doing without while we wait and save for the perfect solution. Since this is now our second rainbarrel successfully installed (oooh, I feel a habit coming on), we're feeling expertish enough to provide this quick tutorial on rainwater collection.
 First, collect the necessary parts. An inexpensive hose bibb (otherwise known as a spigot), a pvc adapter for the inside, and two O-rings are all it takes - plus the rainbarrel, of course. Our first barrel was actually a holeless trashcan my husband salvaged from a nearby river. A perfect example of the second R of waste management - REUSE. This second "barrel" is also a trashcan, but unfortunately, one purchased from the Evil Empire. My apologies, Gaia.
 Drill a 1/2" hole a couple inches up from the bottom of the trashcan. I'm sure there's some fancy drill bit available that will do this job perfectly and professionally, but I like using what we have, even if it means making a series of smaller holes which, when connected, make a shape roughly estimating a circle.
 Put one of the O-rings on the spigot and twist the spigot into the lovely hole you just made.
One of the reasons you don't want your spigot too close to the bottom of the barrel is to allow for the sediment from your roof to settle without clogging up your plumbing. Every couple years, when you don't have anything better to do, you can always empty out the sludge from your rainbarrels and take pictures to show your grandchildren how much of a neat freak you were.
 From the inside, place the other O-ring on the spigot, then the pvc adapter piece, and tighten until you can't tighten no more. This is a picture of the inside of our barrel just before we tightened, so you could see how it all goes together. (Have you ever realized how difficult it is to take a good picture from the inside of a black trashcan?)
This would then be a good time to fill up the can until there's water a couple inches over the newly installed spigot in order to check for leaks.
 Now to attack the gutter's downspout. If you're lucky enough to have them already installed, your battle will be pretty easy. Simply remove the bracket(s) that are currently keeping the downspout from wiggling all over your wall.
Am I the only one shocked by the previous exterior color scheme of my house?!?!
 Then, estimating the general length you'll need to reach past the lid of your barrel, vent your frustrations on the downspout with a hacksaw or other suitably destructive tool. You can make a more exact cut later, but right now, you just need to shorten it so that you can get your trashcan up under it.
 You'll need to raise the barrel up off the ground somehow. In this instance, my husband found the cutest pallet imaginable (it's only about 1-1/2' square) at his work and immediately thought of me. Isn't he a sweetheart?! Other women get diamonds, I get a mini-pallet. I love it!
Our other rainbarrel is resting on a couple limestone blocks that we've ripped out of an undesireable "landscape feature" in our front yard. Whatever you end up using, it needs to be sturdy enough to handle the weight of a rainbarrel filled with water. Remember, a gallon of water weighs 8.35 pounds, so based on the size of your trashcan, it could weigh over 500 pounds when filled. Not exactly something you'd want to fall onto Fido or that bratty kid from next door that is always in your way. You don't need it up very high - you only need enough clearance to get your bucket (or whatever) under it. At the very least, you want room to easily attach a hose on the spigot without creating a nasty kink in the hose.
 With the lid off, put the trashcan in place on its supports with the drainpipe inside the can. Now you can better estimate the exact length needed for the downspout (below the lid, but above the trashcan) and get a good idea on the placement for the hole in the lid. Once you have that, mark out the dimensions. I then drill corner holes which give me my guidelines to cut the hole sides with an electric handsaw. This worked perfectly on the plywood cover we used for the first rainbarrel (since stores don't sell trashcan lids separately - ugh), but having tried this on the plastic lid, I suggest you start with the tool I eventually ended up using - a pocketknife.
 Here's the finished downspout fitting almost perfectly into the finished lid.
Once the threat of rain is removed, we'll probably run a bead of caulk or some of that expanding foam stuff around the joint in a feeble attempt to keep out mosquitos, but we'll cross that bridge when we come to it.
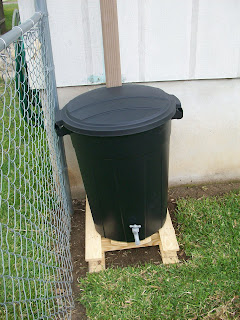 And here's the final product - Chez Baril II.
Since I already had it out, I used the electric hand saw to shape around the bottom of the barrel to provide bucket access under the spigot while still keeping the barrel centered over the pallet.
And how much did these Gaia-approved barrels of liquid fun cost us? All told, we spent less than $22 and about two hours to setup both barrels.
Now, of course, we're just waiting for the rain.
Now, of course, we're just waiting for the rain.
FABULOUS!!! What a great idea! Just do a quick little rain dance and you'll be all set ...
ReplyDeleteI'd be all over this if we had stinkin' gutters. Damn suburban developers!
ReplyDeleteYou guys are true artistes! I sometimes wonder what the heck we are doing out here on four acres in Wimberley, when we are so inept at DIY projects, but when a place calls to you, it calls to you! Since we are on a well that is in serious peril of going dry, we are stepping up from garden rain barrels to The Real Deal. We have the new gutters up, but the tank won't arrive for another six weeks or so - just in time to have completely missed out on what will probably be our only rain for the year!
ReplyDeleteExcellent! I'd been buying recycled food-barrel rainbarrels, but I think my next ones are going to be trashcan barrels to save on cost. I think I saw a trashcan in the creek the other day...
ReplyDelete